I finely got around to uploading a video of my dog playing up at Lake Alpine. This is the same place I took some time elapse pictures of the creek.
Tuesday, November 29, 2011
Sunday, November 27, 2011
Panoramic Mt. Whitney
Today I was going through some pictures and came across some from my hike up Mt. Whitney. I ascended the Mountaineers route and took this panoramic from the slabs just below Upper Boy Scout Lake. The view from here was breathtaking and pictures don't do it justice!


Tuesday, November 22, 2011
Intel 310 MSATA in ThinkPad Edge
I recently purchased a ThinkPad Edge 420. I love it, except the slow platter drive. It was nice to find out it supports the new MSATA SSD's. I ended up purchasing the Intel 310 series 40GB MSATA SSD from New Egg. They seemed to have the best deal and quickest shipping.

I installed the SSD in the small bay between the HDD and battery. I had to find a screw to fasten it down.

Since this was a new computer I didn't bother backing up anything but the drivers and recovery disks.
The drivers folder is here (It would normally be C:)

I did a clean install of windows 7 on the SSD. After installing Windows 7 I updated to SP1 before installing the drivers. I read somewhere that some of the drivers are unstable before SP1. After getting everything updated and installed I ran some benchmarks to compare the results. I used CrystalDiskMark to do the test. For what it's worth I tested the SSD with the OS running off of it, while the HDD didn't. I also used a stop watch to time restart times and was extremely surprised with the results! SSD - 25sec vs. HDD - 65sec
The benchmark results:
Intel 40GB MSATA SSD 410:


I installed the SSD in the small bay between the HDD and battery. I had to find a screw to fasten it down.

Since this was a new computer I didn't bother backing up anything but the drivers and recovery disks.
The drivers folder is here (It would normally be C:)
I did a clean install of windows 7 on the SSD. After installing Windows 7 I updated to SP1 before installing the drivers. I read somewhere that some of the drivers are unstable before SP1. After getting everything updated and installed I ran some benchmarks to compare the results. I used CrystalDiskMark to do the test. For what it's worth I tested the SSD with the OS running off of it, while the HDD didn't. I also used a stop watch to time restart times and was extremely surprised with the results! SSD - 25sec vs. HDD - 65sec
The benchmark results:
Intel 40GB MSATA SSD 410:

Factory 7200 RPM 500GB spinner:

I was a little skeptical installing 64bit Windows 7 on a 40GB drive but I have plenty of space for programs (after all drivers, SP1 and updates I have roughly 20GB free), and then I also have 500GB for all of my documents and files. I did however disable hibernation. The 80GB 310 series is supposed to be almost 2x as fast, but I was able to cut my restart time by over half with the 40GB model.
Sunday, November 20, 2011
Xterra Under Seat Subwoofer
I wanted to find a solution for getting a sub woofer into my Xterra with out sacrificing cargo space. I found some plans for an under seat sub on a Frontier forum. I converted his drawing into a simple Google Sketch Up file, and built it. The under seat area seems to be the same between the Frontier and Xterra.
Here are the drawings I came up with based on the above URL:


I used 7/16" birch ply and carefully cut out the pieces on the table saw. It was rather tricky coming up with a cut list. The overall height of the box cannot be any bigger than the above listed height (even a 1/4" would make it too big!)
Once all of the pieces were cut out, I used wood glue and brad nails to hold it together. Once the wood glue dried I sealed the box up with silicone.
Here is a picture of the finished box:

A picture of it installed (excuse the install mess):

It sounded great for what it was. I felt that it lacked low end bass. Before bolting the seat down make sure you do something to sound deaden the underside. I didn't and the seat rattled on certain notes.
Saturday, November 12, 2011
Xterra V1 Mount
Back in march I set out to make a clean mount for my Valentine 1 radar detector. I wasn't too confident with the suction cup's ability to stick to the black coating behind the rear view mirror of the Nissan Xterra. I went to tap plastic and got all of the parts. They can be located here Tap Plastics I was out the door for $3.30, $0.30 was CA sales tax 
Parts list:
-4"x2" ABS plastic (one side smooth other textured).
-2 Clear Plastic screws with nuts.
-1' Velcro
1) Gather all of the parts:


Parts list:
-4"x2" ABS plastic (one side smooth other textured).
-2 Clear Plastic screws with nuts.
-1' Velcro
1) Gather all of the parts:

2) Next cut the plastic to size, I believe it was 3.5" x 2" and round the corners. Drill two holes so that they line up with original V1 mount (where the suction cups used to be)

3) Bolt the plastic piece you just made to the original V1 mount. Make sure you put the textured side towards the V1 mount (this will make it look like the factory mount).

4) Cut out Velcro strips to place on the ABS plastic (smooth side towards windshield).

5) Place it on the windshield and enjoy!


6) To wire it into the vehicle I used (Direct-Wire Power Adapter Kit - Item 00030) from Valentine One's website. It cost ~ $20
Saturday, November 5, 2011
Photos of Winter
Some pictures I took last year of the Yuba river in the Sierras.


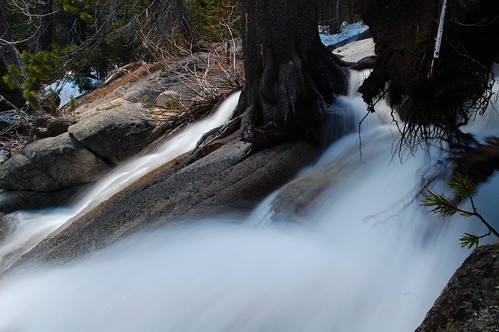
This one was taken at Lake Alpine up Highway 4
Wednesday, November 2, 2011
Kodi Playing in Snow
The first snow came early this year! Finley got around to uploading the video of Kodi playing in the snow. About 2 feet of snow fell during the storm.
First Post
Hi,
My name is Karl and I love the outdoors. I also enjoy photography, wrenching, mechanics, electronics, and anything else guys get geeked out on! I want to shaire some of my hobbies with the world.
I will post pictures I take, projects I work on, and other random stuff!
-KT
My name is Karl and I love the outdoors. I also enjoy photography, wrenching, mechanics, electronics, and anything else guys get geeked out on! I want to shaire some of my hobbies with the world.
I will post pictures I take, projects I work on, and other random stuff!
-KT
Subscribe to:
Posts (Atom)